Raster (basemap) layer
The mobile application map screen supports the rendering of multiple raster layers. It requires that at least 1 file is nominated as a basemap.
You can load new and switch on and off multiple rasters by pushing the
layers icon

which will take you into the Layer Manager Dialog, where you can manage existing layers:
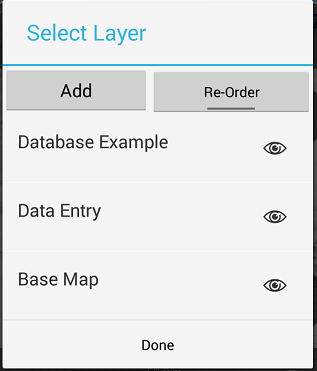
Switch Layer visibility on or off

Re-order
- After pushing this button (blue underscore will signal its activation) you will be able to toggle the layers to their new order
Select Layer
- Upon tapping a layer in the Layer Manager the row will become
highlighted in blue. This signals that the layer has been selected. If
this is a Data Entry or a new Canvas layer you can edit it. You can see
the confirmation in the Map view as the name of the Selected Layer will
now appear next to the Layer Icon in the following
way:
[Database Layer]
Add
- This button will open a new menu where you can select a variety of layers you want to load or create

Load Base Layer opens a dialogue where you:
-
can assign a name to your layer
-
browse for the geotiff that you want to use as a basemap
-
click "Done"
-
click OK and appear back in the map screen. Give the images a moment to load and tap the screen with your finger once or twice. Brief human input may be necessary when rendering rasters on older devices.
Load Raster Layer will do the same as Load Base Layer and load additional bitmap images.
Load Vector Layer will navigate through to available legacy vector files and load them for you.
Load Database Layer loads the legacy vector files that have been converted into Spatialite databases.
Create Canvas Layer - creates a new editable layer for temporary markings, drawing, measurements, etc.
View Track Log - will render the tracklog on the map.